The moment you reach the cable generator in We Were Here Tomorrow, it becomes clear: solving the cable puzzle is crucial to progressing further. It’s not just about flipping switches randomly; the system demands a precise activation order to channel power without backtracking or dead ends. Mastering this challenge defines whether you inch forward or hit a frustrating halt.
Follow the route below to solve this cable puzzle without getting stuck when the power stops moving forward. You also don’t need to activate every available module.
We Were Here Tomorrow Cable Puzzle Solution
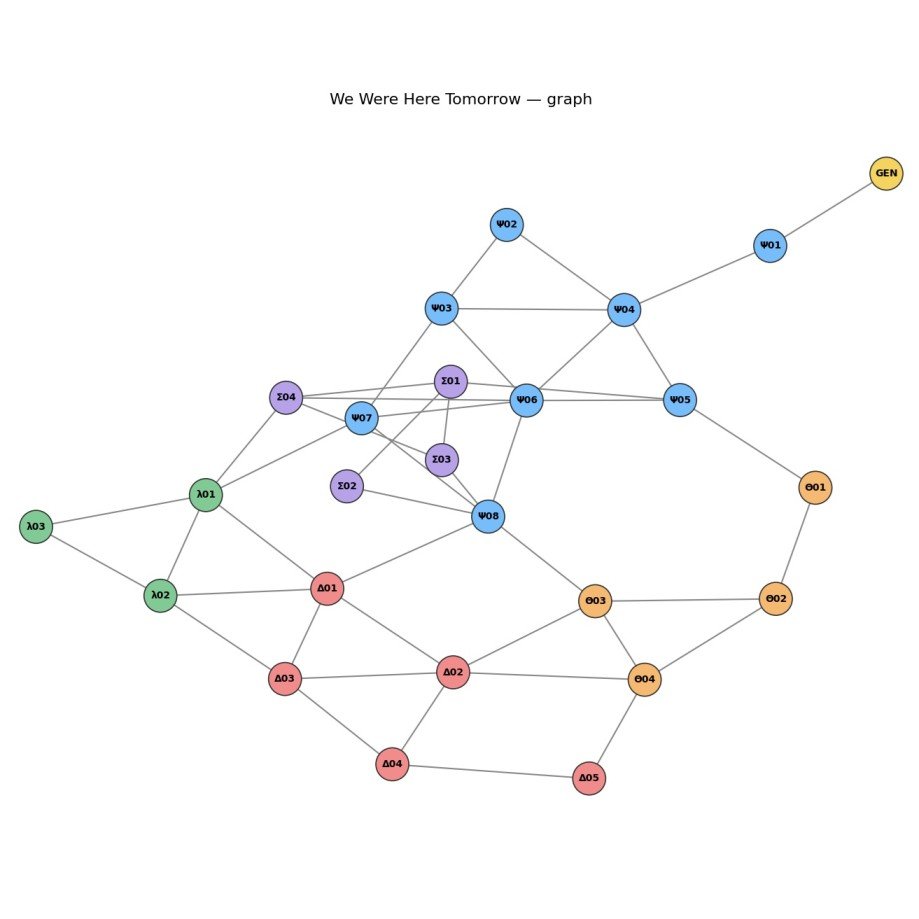
Begin this puzzle at the GEN module, then activate the following modules in this exact order to keep power flowing through the system:
GEN → Ψ01 → Ψ04 → Ψ02 → Ψ03 → Ψ06 → Σ04 → Σ03 → Σ01 → Σ02 → Ψ08 → Θ03 → Δ02 → Δ03 → λ02 → λ03 → λ01 → Ψ07
Remember, each module can only be activated once and must be directly connected to the one activated before it. This sequence ensures you avoid dead ends and keep the power flowing smoothly through the cables.
How to Unlock the RED, GRE, and BLU Doors
The key to unlocking the three colored doors lies in activating certain crucial modules along the route. Each door guards access to extra modules needed to complete the puzzle.
| Door | Module to Activate | What It Unlocks |
|---|---|---|
| RED | Σ03 | Δ01, Δ03, and Δ04 |
| GRE | Σ02 | Θ01, Θ02, Θ03, and Θ04 |
| BLU | Δ03 | λ01, λ02, and λ03 |
Following the main activation route, you'll naturally hit these modules in order to open each colored door:
- Activating Σ03 opens the RED door.
- Activating Σ02 opens the GRE door.
- Activating Δ03 opens the BLU door.
Cable Puzzle Rules Explained
Understanding the mechanics helps you plan your moves intelligently. Here's how the system works:
- Start at GEN: This is the only valid starting point for the sequence.
- Follow connected modules: Each module you activate next must be directly connected to the previous one.
- Never revisit modules: Each module can only be activated once, so plan your path carefully.
- Initial options: At the start, GEN, all Ψ modules, all Σ modules, Δ02, and Δ05 are available to activate.
- Colored doors: RED, GRE, and BLU represent locked doors, not modules; you can’t activate them but must unlock them via specific modules.
The main challenge is mapping a path that activates all necessary modules without blocking future steps. Missteps commonly cause power to stop flowing, forcing restarts.
Stuck at the Third Battery? Try This
If activating several modules seems correct but the cables stop transferring power, double-check your order instead of assuming a bug.
To solve the third battery segment, activate modules in this order:
W1 → W4 → W2 → W3 → W6 → E4 → E3 → E1 → E2 → W8 → O3 → A2 → A3 → λ2 → λ3 → λ1 → W7
After this sequence, pressing W7 again continues powering the cables. Not every generator has to be activated to complete this section.
If you get stuck, using the reset option will clear your selections without erasing completed battery progress, giving you a chance to try a different path.
Always verify module labels match your panel, as misread labels can cause confusion and errors when following the solution route.