[quick_answer title="Quick Answer"]
To earn every achievement in HoloTrials: Case Covered, thoroughly inspect all objects during investigation phases, search hallways and optional chats for Pekotokens to clear the gacha machine, and exhaust all character dialogue before progressing the main story. A brief post-game visit to the Occult Club Room unlocks the final conversation.
[/quick_answer]
Unlocking all holotrials: case covered achievements requires a thorough sweep of the school grounds, gathering every hidden Pekotoken, and exhausting dialogue trees before triggering major plot points.
Several conversations and inspectable props are easy to bypass if you advance scenes too quickly. Fortunately, almost all trophies become accessible well before reaching the closing credits.
All Achievements
Case Covered!
Beat the game
This is the standard story progression unlock that triggers automatically once you reach the ending sequence of the trial.
Whenever you find yourself stuck during the courtroom cross-examinations, reviewing a trial choice walkthrough will keep your momentum going without penalty.
Shame on the Gacha Addict
Collect all Pekotokens and unlock all gacha
You can fulfill every requirement for this award prior to reaching the finale by collecting all currency during exploration phases.
Start by scouring the hallways to interact with every cluster of posters and the Myth Items display, as these award essential currency drops.
Make sure to check each of the following locations across the campus grounds:
Poster and Myth Item Locations
Courtyard: 1 set of posters positioned directly to the right of the North Building entrance.
North Building F1: 3 sets of posters, split between 2 on the left wall and 1 on the right.
North Building F2: 1 set of posters alongside the display of Myth Items.
West Building F1: 1 set of posters on the main wall.
West Building F2: 1 set of posters along the hallway corridor.
Dialogue Coin Rewards
A substantial portion of your token budget comes from optional socializing during breaks and investigations.
Seek out and speak with these specific pairings during the designated windows:
Mumei and Kiara: Located in the Cafeteria during Day 1 Trial – Intermission 1.
Bae and Calli: Hanging out in the Courtyard during the Day 2 Investigation.
Kiara and Ina: Chatting inside the Art Room during the Day 2 Investigation.
Fauna and Mumei: Standing in the North Building F1 corridor during Day 2 Trial – Intermission 1.
Once you gather the full sum of currency, feed every coin into the gacha machine until the prize pool is completely cleared out.
Defecto Detecto
Inspect Everything
Like the gacha challenge, this milestone can be earned well before you wrap up the main narrative.
During investigation sequences, inspect every single clickable element on screen rather than only the obvious evidence points.
Whenever a room gives you the prompt to present items or surfaces, cycle through every option available to ensure all flags register.
Ensure you inspect every item listed across each designated crime scene and storage room below:
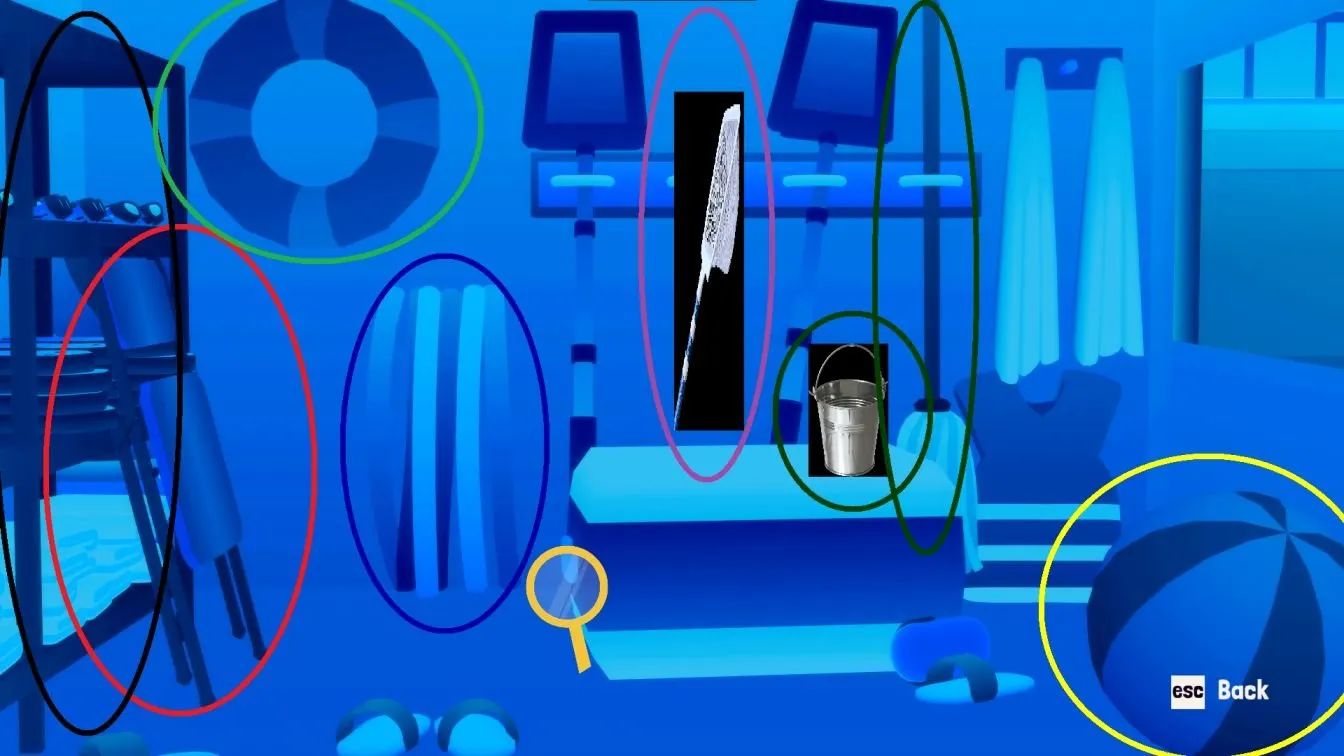
Janitor Closet Checklist
Examine each of these maintenance items carefully:
Storage rack
Chair
Life saver
Pool noodles
Pool net
Bucket/mop
Ball
Keep in mind that the mop and bucket track as distinct entities in some builds. Clicking the bucket causes it to vanish, so confirm you register both pieces.
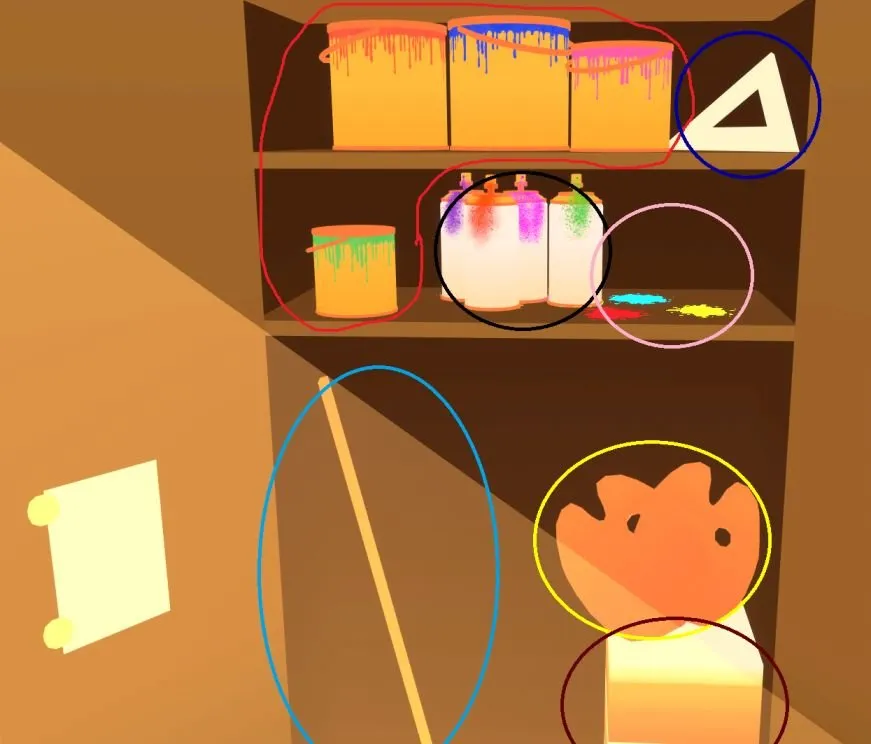
Mumei Closet Checklist
Search through this supply space and inspect each element:
Paint cans
Triangle
Spray paint cans
Missing spray paint cans
Ruler
Palettes
Boxes
While items resting on the top shelf cannot be collected directly, clicking them still triggers internal inspection flags required for progress.
Art Room Presentation
During your presentation prompt in the Art Room, present every piece of artwork lining the displays.
Always save Gura’s Piece on the far left for last, as presenting it prematurely advances the sequence.
Council Room Presentation
When inspecting the seating arrangement inside the Council Room, present each individual chair around the table.
Make sure to leave Bae’s Chair—the middle seat with a book sitting underneath—for your final presentation.
Yapper
Experience every interaction
Securing this unlock requires speaking with every student on campus and completely draining their topic trees.
Unread dialogue often displays an exclamation point next to the prompt, while completed topics receive a checkmark. However, these visual cues are not universally present.
Never rely solely on visual icons when clearing scenes. Systematically click every prompt until characters repeat their default idle chatter.
Pay special attention to the following missable dialogue encounters throughout your playthrough:
Day 1 Recess Interactions
When court takes its initial break, head immediately into the Cafeteria to converse with Kiara and Mumei.
You must also talk to Gura twice in this interval. Picking her initial dialogue option abruptly terminates the chat, requiring you to re-engage her manually.
Whenever you speak with Sana during any recess period, make a point to select the response stating you are not yet ready.
Day 2 Investigation: Gura
Seek out and speak with Gura before interacting with Fauna during this phase.
Engaging Fauna first triggers scripted narrative events that push the schedule forward, permanently locking you out of Gura's dialogue.
Day 2 Investigation: Sana
During your second day of sleuthing, track down Sana right after Kronii interrupts the scene.
This specific conversation hands you the critical Art Room Inventory, registering both dialogue and evidence data.
Secret Ina Dialogue
Once you finish the story and clean out the entire gacha machine, launch a fresh save file.
Approach and inspect the campus Yagoo statue to enter the hidden Occult Club Room, where you can speak with Ina for her bonus scene.
Courtroom Dialogue Impact
You do not need to intentionally fail arguments or explore every incorrect testimony branch to satisfy the requirements for Yapper.
The achievement unlocks smoothly even if you clear the trial segments directly using standard, correct reasoning.
Direct your attention toward recess conversations and hallway encounters, as those hold all the truly missable dialogue flags.